
Co-authored with Andrew Block
A key concept in Sigstore is its availability. Anyone can leverage the hosted tooling to sign, publish and verify assets and incorporate it into their security processes.
In a corporate context with private repositories and private artifacts as well as restricted access to external resources, it must be questioned whether it makes sense to use the public Sigstore deployment. Sensitive information might be exposed. Given the principles of the Sigstore architecture, it cannot be erased or fenced off. For instance, when using the GitHub OIDC token provider for Github Actions, provenance information is baked into the generated certificate — making it visible to anybody on the Rekor transparency log. Theoretically, this could inform supply chain attacks or give away competitive advantages.
However, it is possible to host a private instance of Sigstore, hence allowing the combination of privacy and internal supply chain transparency. As the logs are private, it is key to set up monitoring for it. This can’t be highlighted enough. Without monitoring, maintaining a private Sigstore deployment is just a project without any ROI.
In this guide, we will demonstrate how to stand up a Sigstore deployment on your own infrastructure on Kubernetes so that you will be able to take advantage of the benefits and the assurance of not exposing sensitive resources. In particular, we will be using minikube for running the Kubernetes environment. kind is an alternate option, but it will not be described within this article. Refer to this article for using kind as an operating environment. After laying out the reasons for considering a private deployment and the tooling to support the underlying Kubernetes environment, the remainder of the article will focus on deploying and validating the private sigstore environment.
Architecture
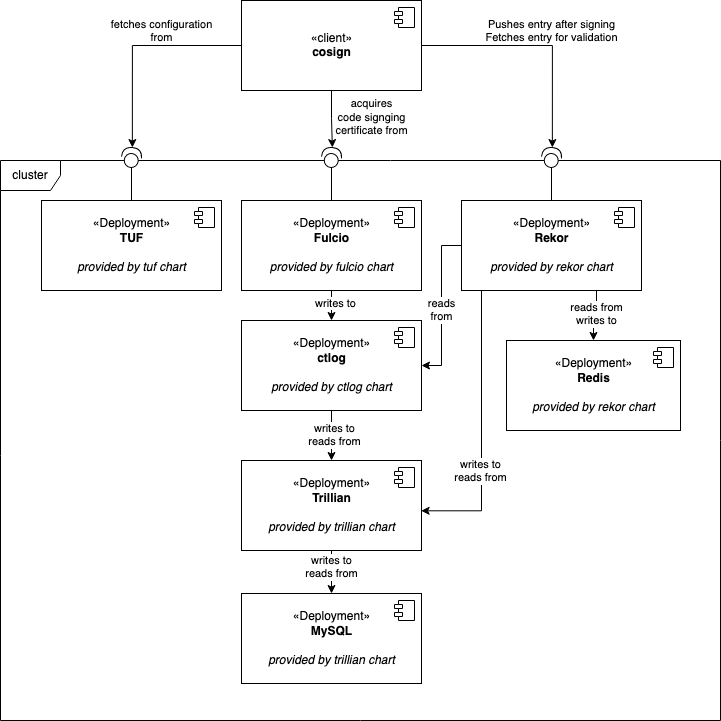
Architecture diagram of the final Sigstore deployment, and the interaction of its components as provided by the scaffold helm chart. The chart is available here.
A Sigstore deployment has several components. Each one is deployed via separate helm chart, all provided by the Sigstore project. The UML component diagram above depicts the hierarchy and data flow between the components. While the components inside the cluster box make up a deployment and are hard to exchange, the clients interfacing with it may vary.
For instance, instead of cosign it could be a Kyverno policy controller connecting to Rekor to verify an image signature before actually deploying the image.
Prerequisites
To follow this tutorial, the following tools are needed:
- Docker
- minikube
- helm
- kubectl
- cosign
- ko
- go
Apart from that you just need the internet, some available memory and disk space and most importantly — time :)
This tutorial was constructed on MacOS on Intel using the following tool versions:
- minikube 1.28.0
- helm 3.10.0
- kubectl 1.25.2
- cosign 1.13.1
- ko 0.12.0
- Go 1.19.1
- Docker Desktop 4.13.1
Throughout the next steps, there will be references to files that aren’t included within this article. You can find them in this repository: flxw/sigstore-local-setup.
Create a local k8s cluster
Construct the minikube cluster as follows, and enable the ingress addon. If you are using MacOS, please make sure that your ingresses can be reached. There seem to be driver-related issues with that, as laid out in this GitHub issue and this StackOverflow question.
# MacOS users: in case of problems with accessing ingresses
# consider using - driver=hyperkit
minikube start
minikube addons enable ingress
Create DNS entries
To allow DNS name resolution, you need to add the following entries to your hosts file.
cat <<EOF >> /etc/hosts
$(minikube ip) fulcio.sigstore.local
$(minikube ip) rekor.sigstore.local
$(minikube ip) tuf.sigstore.local
$(minikube ip) registry.local # only needed for testing
EOF
Set up Sigstore
Now that the groundwork has been laid, getting Sigstore up and running is fairly easy using the provided Sigstore helm charts. Simply add the official repository and install the scaffold chart.
The chart bundles all of the required components together and has sane defaults. The provided scaffold.values.yaml completes the setup with the names of the TLS secrets that will be added in the next step.
helm repo add sigstore https://sigstore.github.io/helm-charts
helm upgrade \
 -i scaffold \
 sigstore/scaffold \
 -n sigstore \
 --create-namespace \
 --values scaffold.values.yaml
As the helm chart unfolds, several jobs will execute and deployments will become available in succession. As soon as all deployments become available, you can consider Sigstore to be deployed. If you want to automate this task, you can wait on the tuf deployment.
kubectl rollout status deployment scaffold-tuf-tuf -n tuf-system --timeout=90s
Generate a TLS certificate chain
The Sigstore tooling is quite sensitive to unencrypted HTTP traffic as well as SSL certificates signed by an unknown authority. For easy local testing, we advise constructing a locally trusted root certificate and using it to sign each of the certificates used by Sigstore’s Rekor, Fulcio and Ctlog. The following snippet handles the generation automatically.
#!/bin/sh
# TODO for you: add ca.cert.pem to trust store and configure explicit trust
openssl req -x509 -newkey rsa:4096 -keyout ca.private.pem -out ca.cert.pem -sha256 -days 365 -nodes

for service_name in rekor fulcio tuf; do
    cat << EOF > $service_name.cert.ext
authorityKeyIdentifier=keyid,issuer
basicConstraints=CA:FALSE
keyUsage = digitalSignature, nonRepudiation, keyEncipherment, dataEncipherment
subjectAltName = @alt_names

[alt_names]
DNS.1 = $service_name.sigstore.local
EOF

    openssl req -new -newkey rsa:4096 \
        -keyout $service_name.private.pem \
        -out $service_name.req.pem -nodes

    openssl x509 -req -in $service_name.req.pem \
        -days 365 -CA ca.cert.pem -CAkey ca.private.pem \
        -CAcreateserial -out $service_name.signed.cert.pem \
        -extfile $service_name.cert.ext

    kubectl create secret tls $service_name-tls \
        --namespace=$service_name-system \
        --cert=$service_name.signed.cert.pem \
        --key=$service_name.private.pem
done

cat <<EOF >> /etc/hosts
127.0.0.1 fulcio.sigstore.local
127.0.0.1 rekor.sigstore.local
127.0.0.1 tuf.sigstore.local
127.0.0.1 registry.local
EOF
Very important: After generation is complete, you need to add “ca.cert.pem” to your OS’ trust store.
Initialize cosign
Now that Sigstore is up and running, and we can establish a verified TLS connection, it is time to interface with it using a client. We will use cosign, an official tool from the Sigstore project. It has the public configuration baked in, allowing it to discern valid signatures from invalid ones. This requires us to take an extra step and add to the client the configuration specific for our private deployment.
Cosign verifies identity of the cluster with certificates, and these are distributed using the TUF framework. After the TUF component of the deployment has come up, it constructs a trust root. You need to extract this root from Kubernetes secret and initialize the client with the following commands:
cosign initialize \
  --root https://tuf.sigstore.local/root.json \
  --mirror https://tuf.sigstore.local
Create a local registry and test container
For the sake of this tutorial we need a container registry and container image to work with. To avoid polluting any public repository, we will bring up our own registry:
docker run -d \
 --restart=always \
 -p 5000:5000 \
 --name registry.local \
 registry:2
Next, we will create a container image using ko and push it into the local registry. We will sign and verify this image in the next step.
export KO_DOCKER_REPO=registry.local:5000/sigstore
pushd $(mktemp -d)
go mod init example.com/demo
cat <<EOF > main.go
package main
import "fmt"
func main() {
   fmt.Println("hello world")
}
EOF
export IMAGE=`ko publish -B example.com/demo`
echo "Created image $IMAGE"
popd
Sign test image and verify
With the test image safely in the locally running registry, we can go ahead and sign it using cosign. Cosign offers several ways to do that, and we will use the keyless approach. The beauty of keyless signing is that does away with the need to manage and safeguard a private key: A short-lived keypair is used for signing, recorded on the certificate transparency log, and then discarded.
While signing, we also need to tell cosign about the URLs to our Fulcio and Rekor instances. Of course, the image digest obtained in the previous step is required as well.
REKOR_URL=https://rekor.sigstore.local
FULCIO_URL=https://fulcio.sigstore.local
export COSIGN_EXPERIMENTAL=1

# add --verbose if you are curious ;)
cosign sign \
 --fulcio-url=$FULCIO_URL \
 --rekor-url=$REKOR_URL \
 --force \
 --allow-insecure-registry \
 $IMAGE
A web browser will be launched to access the official Sigstore DEX forwarder where you can authenticate using your Microsoft, GitHub, or Google credentials. It is certainly possible to run DEX or another OIDC provider locally, but that is out of scope for this tutorial.
Cosign requires the URLs to know where to contact Fulcio to have the ephemeral keys signed, and where Rekor is located. The — force flag tells cosign to push the entry into Rekor even though the registry is private. This flag makes more sense when using the public Sigstore infrastructure, and helps avoid data leaks. The — allow-insecure-registry flag allows using pure HTTP.
Now that the artifact is signed, it is time for verification. This only requires access to Rekor:
cosign verify \
 --allow-insecure-registry \
 --rekor-url=https://rekor.sigstore.local \
 $IMAGE
The output from that command will tell you which checks were performed and whether cosign deems the artifact to be in compliance with the signature. Furthermore the tool prints out a JSON object holding information about the signer and OIDC token issuer.
**Warning** Missing fallback target fulcio.crt.pem, skipping
**Warning** Missing fallback target fulcio_intermediate_v1.crt.pem, skipping

Verification for ghcr.io/flxw/example-image@sha256:cab1dab84c35c2f9382ece97b02a42903a3135e7c1b81d937798bde9bf3ef486 --
The following checks were performed on each of these signatures:
  - The cosign claims were validated
  - Existence of the claims in the transparency log was verified offline
  - Any certificates were verified against the Fulcio roots.

[
 {
     "critical": {
         "identity": {
             "docker-reference": "link to the image repository"
         },
         "image": {
             "docker-manifest-digest": "sha256:cab1dab84c35c2f9382ece97b02a42903a3135e7c1b81d937798bde9bf3ef486"
         },
         "type": "cosign container image signature"
     },
     "optional": {
         "1.3.6.1.4.1.57264.1.1": "The URL of the OIDC token forwarder",
         "Bundle": {
             "SignedEntryTimestamp": "MEQCID6d6hmPeQo/5X1EMJ4ckeUr/DAS1xrXWWuHCGG4LmtDAiAwAoBltFCaou1GrHcwW+Q5ksBjM4M4nyJZgoy/2J4RHA==",
             "Payload": {
                 "body": "a base64 encoded rekor entry",
                 "integratedTime": 1670247473,
                 "logIndex": 36,
                 "logID": "9c9a9d6e1015ead6ab63d0bdc06f2309f59c75fd53d767512308657b0dbcf34d"
             }
         },
         "Issuer": "github, google or microsoft url",
         "Subject": "your email address"
     }
 }
]
Next Steps
Congratulations on setting up your local Sigstore deployment! This might be the first step towards improved software supply chain transparency in your company. Having gone through all these steps to deploy the project, you might be asking yourself how to actually maintain it? How to handle disaster-recovery, how to manage keys, and how to monitor it?
Setting up monitoring for the involved transparency logs is extremely important. Without monitoring, maintaining a private Sigstore deployment is just a project without any security benefit. A starter can be the rekor-monitor for making sure that the log is consistent.
If you are curious about finding answers to these questions, and helping the Sigstore project move forward on the topics, please join us in the #private-sigstore-users channel in the Sigstore project Slack!
At the time of this writing, we are putting together a users guide that aims to answer the questions above. We aim at making it a reference manual for the administrator of a private Sigstore deployment, and are happy for anybody who wants to contribute.
Happy signing!