
Users of Sigstore may want to leverage Sigstore tools and infrastructure, but may not want want to rely on Sigstore’s root of trust or all of the components of the public infrastructure. For example, a company may want to maintain a private transparency log for all internal build information but only make entries to a public log for published releases. Or, a user may not want to include their email addresses in a public certificate transparency log. Finally, for legal and privacy reasons, a user or company may need to be fully in control of the entire signing and verification stack, including the root key material.
To enable these use-cases, Sigstore supports what we call Bring-Your-Own (BYO) TUF, where you can set up your own root of trust to use in client tools like Cosign. In this blog post, we’ll go through the steps for creating and managing your own Sigstore infrastructure. This involves spinning up your instances of Sigstore’s core infrastructure, and crucially, establishing the components in a root of trust for Cosign, which will be used for signing and verification. For background on Sigstore’s root of trust and TUF, see The Update Framework and You and A New Kind of Trust Root.
The crucial piece behind establishing a root of trust is TUF. Clients like Cosign start with a TUF root, which by default is the one established during Sigstore’s root key signing ceremony. Clients then use this root to verify that signing material is valid.
As a reminder, Sigstore is composed of a few components:
- Fulcio, a certificate authority that issues code-signing certificates bound to an OIDC identity
- Rekor, an artifact signature and attestation transparency log
- Cosign, a client that uses Fulcio and Rekor to generate signatures for container images and blobs
By default, in order to verify signatures on images, you must trust the Sigstore root of trust and hosted instances of Fulcio and Rekor, since the Fulcio root CA certificate and Rekor public key chain up to the Sigstore TUF root. However, Cosign also supports using a custom root of trust. Next, we’ll walk through the steps to supply your own root of trust into Cosign.
Steps
Required tooling
You will need to install Docker Compose to run Rekor and Fulcio.
You will need to install Cosign to sign and verify artifacts.
Optionally:
To run a production-ready instance of Fulcio, you’ll need to set up a Google Cloud Platform CA Service certificate authority. See the Fulcio setup instructions below for more details.
To generate TUF metadata, you will need to install the TUF CLI. You can also run a script we’ve provided below for testing.
Host instances of Rekor and Fulcio
Rekor
Clone the Rekor repository, and run docker-compose up to start the service.
To confirm it’s working, run curl localhost:3000/api/v1/log/publicKey. You should see a PEM-encoded public key.
Fulcio
Clone the Fulcio repository.
For a simple deployment, you can run a lightweight, non-production instance of Fulcio without a Certificate Transparency (CT) log:
go run main.go serve --port 5555 --ca ephemeralca --ct-log-url=""
For a production-ready instance with support for a CT log, run the following:
- Create a Root CA with GCP CA Service (Docs). Use the DevOps tier.
- Copy the root CA certificate. It can be viewed in the UI after selecting the CA.
- Copy the root CA certificate into
config/ctfe/root.pem. - Edit
docker-compose.yml, changing--gcp_private_ca_parentto the path to the CA. - Run
docker-compose up. - If there are any issues, make sure to tear down the instance with
docker-compose down -vto delete the created volumes too.
To confirm it’s working, run curl http://localhost:5555/api/v1/rootCert. You should see a PEM-encoded root certificate.
Create TUF metadata and root keys
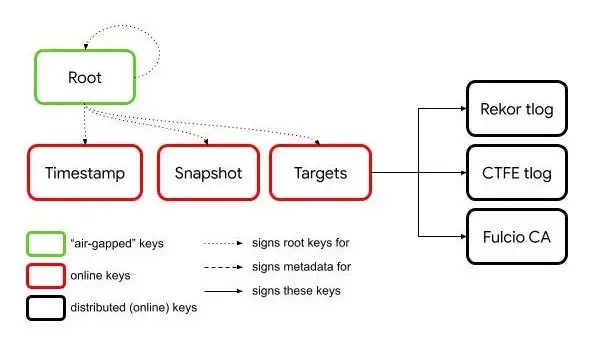
You will need to create TUF metadata securing the root certificate and public keys of the hosted infrastructure before using Cosign. You can use either the go-tuf CLI, python-tuf CLI, or the Sigstore Root Signing repository to generate metadata. If you want to go through a key signing ceremony with hardware tokens, use the Sigstore repo, which will publish metadata to Github. For simplicity, we will use the TUF CLI to generate keys. In this tutorial, we will create an “air-gapped” root signing key by placing it in a different directory. In practice, you should protect your root signing key by keeping it in an offline environment (see this issue for improving go-tuf CLI’s experience for offline keys).
If you’d like to streamline root creation just for testing, this script can be used to generate all keys on the fly. The Root Signing repository also has examples of how to add signatures with hardware-backed and software-backed keys to your TUF metadata.
You will need three directories:
targets— This will contain the TUF targets for verification (Rekor key, Fulcio certificate, optional CT log key)offline-root— This directory will contain the root key and be where you will sign the TUF metadata. We simulate offline keys by using a different directory than where the TUF metadata is created.tuf-repository— This directory will be where you generate all TUF metadata. The other signing keys will also live in this directory.
Before you begin, gather the needed targets in targets. These need to be named canonically for Cosign to recognize them.
- Rekor public key (
rekor.pub) —curl -o rekor.pub http://localhost:3000/api/v1/log/publicKey - Fulcio root certificate (
fulcio.crt.pem) —curl -o fulcio.crt.pem http://localhost:5555/api/v1/rootCert - Fulcio CT log public key (
ctfe.pub) — Note that this is only required if you are running a production instance of Fulcio with a CT log. In the Fulcio directory,cp config/ctfe/pubkey.pem ../targets/ctfe.pub
To generate the TUF repository:
go install github.com/theupdateframework/go-tuf/cmd/tuf- This installs the TUF CLI to$(go env GOPATH)/bin. To include it in your PATH, runexport PATH=$PATH:$(go env GOPATH)/bin.cd offline-root && tuf init — consistent-snapshot=false — This sets up a TUF repository.tuf gen-key root— This generates a root key and creates the TUF root role. You will be prompted for a passphrase to encrypt the root key. Your structure should look like this:
$ tree . # offline-root
 .
 ├── keys
 │ └── root.json
 ├── repository
 └── staged
   ├── root.json
   └── targets
cd ../tuf-repository && tuf init — consistent-snapshot=falseagain.cp ../offline-root/staged/root.json staged/— Copy the root metadata from the “air-gapped” folder into the staged TUF repository
$ tree . # tuf-repository
 .
 ├── keys
 ├── repository
 └── staged
   ├── root.json
   └── targets
- Generate the target, snapshot, and timestamp roles and keys in
tuf-repositorywithtuf gen-key targets,tuf gen-key snapshot, andtuf gen-key timestamp. You will be prompted for a passphrase to encrypt each key. Each invocation ofgen-keyregenerates the root role metadata. cp staged/root.json ../offline-root/staged/— Copystaged/root.jsonto the “air-gapped” directory.cd ../offline-root && tuf sign root.json— Sign the root metadata in the “air-gapped” directory.cp staged/root.json ../tuf-repository/staged && cd ../tuf-repository— Copystaged/root.jsonback to the online directory. You can now begin to sign targets.cp ../targets/* staged/targets— Copy the Fulcio root certificate, Rekor public key and optional CT log public key to the staged targets folder. These are the minimum targets needed for Cosign.
$ tree . # tuf-repository
 .
 ├── keys
 │ ├── snapshot.json
 │ ├── targets.json
 │ └── timestamp.json
 ├── repository
 └── staged
   ├── root.json
   └── targets
     ├── ctfe.pub
     ├── fulcio.crt.pem
     └── rekor.pub
tuf add— Add all staged targets to the targets metadata and sign the metadata with the targets key.tuf snapshot— Create a snapshot of the metadata.tuf timestamp— Create a timestamp of the snapshot. Your directory should now look like:
$ tree .
 .
 ├── keys
 │ ├── snapshot.json
 │ ├── targets.json
 │ └── timestamp.json
 ├── repository
 └── staged
   ├── root.json
   ├── snapshot.json
   └── targets
   │ ├── ctfe.pub
   │ ├── fulcio.crt.pem
   │ └── rekor.pub
   ├── targets.json
   └── timestamp.json
tuf commit— Move everything in the staged directory to the repository.
$ tree .
 .
 ├── keys
 │ ├── snapshot.json
 │ ├── targets.json
 │ └── timestamp.json
 ├── repository
 │ ├── 4.root.json
 │ ├── root.json
 │ ├── snapshot.json
 │ ├── targets
 │ │ ├── ctfe.pub
 │ │ ├── fulcio.crt.pem
 │ │ └── rekor.pub
 │ ├── targets.json
 │ └── timestamp.json
 └── staged
   └── targets
You will now have two TUF directories, one that contains the targets, and one “air-gapped directory” which contains the root signing key. Generating new root keys will require copying the online staged/root.json file to the air-gapped directory, and running tuf sign root.json again. See the documentation for more information, including setting thresholds on the number of required signatures.
Initialize Cosign with TUF root
To use Cosign with your own TUF root, you will need to provide a path to the initial trusted root.json along with a mirror repository to fetch updates.
Host TUF repository
First, we will host the TUF repository. This will be used by Cosign to download targets and find updates. For example, if you rotate any role signing keys or resign metadata such as the timestamp or snapshot, Cosign will use the mirror to find the new TUF metadata.
You can choose to put all files in the repository folder created above, including all .json files and targets in the targets folder, in a GCS bucket. You can also use an HTTP server to serve the repository. For this example, we’ll use Python’s simple HTTP server. In the TUF repository tuf-repository, run:
cd repository
ls # You should see all all JSON metadata and a targets directory
python3 -m http.server 8081
This will create a local server to access the TUF metadata.
Use self-hosted instance with Cosign
cosign initialize --mirror http://localhost:8081 --root path/to/root.json
When distributing your TUF root to other clients, they must have a trusted copy of the root.json provided out of band from the repository mirror. Running initialize will verify the remote repository against the trusted initial root, and then download the associated metadata and verified targets into a local cache on the filesystem. The local cache takes precedence of Sigstore’s default trusted root, so Cosign verification is backed against the new TUF root.
Cosign sign and verify seamlessly
Sign
When running an ephemeral instance of Fulcio with go run:
COSIGN_EXPERIMENTAL=1 cosign sign --fulcio-url http://localhost:5555 --rekor-url http://localhost:3000 --insecure-skip-verify us-west1-docker.pkg.dev/project-id/docker-repo/image:tag1
When running the production-ready instance of Fulcio with a CT log:
COSIGN_EXPERIMENTAL=1 cosign sign --fulcio-url http://localhost:5555 --rekor-url http://localhost:3000 us-west1-docker.pkg.dev/project-id/docker-repo/image:tag1
Verify
COSIGN_EXPERIMENTAL=1 cosign verify --rekor-url http://localhost:3000 us-west1-docker.pkg.dev/project-id/docker-repo/image:tag1
Caveats
Note that currently the only way to use your own TUF root is by running cosign initialize to create or update the local cache. Avoiding disk writes from Cosign (using SIGSTORE_NO_CACHE) is incompatible with swapping a new root, since Cosign verify doesn’t use any configuration files or environment variables that provide the location of the custom TUF root (1288). In the future, we may add support for using remote network calls to fetch the custom TUF targets without a local cache, trading the disk write from cosign initialize with a remote call.
For the same reason, if your local custom root expires, clients will detect that the TUF local cache has expired and fallback to using Cosign’s embedded TUF metadata. They must re-run the cosign initialize command to pull updates from the remote repository (1289). Again, the Cosign client does not store state, specifically the location of the custom remote repository. We highly recommend users of BYO TUF to run cosign initialize as frequently as they can make the network calls to pull the latest updates!
We are working on improving the UX for these features. You can track development progress on Github on issues 1288 and 1289.